I recently moved and our new home is equipped with a ventilation system that distributes fresh (outside) air through the house and recoups heat from the air that is exhausted. There is a problem with this system, though. Sometimes, for example when a neighbour lights their wood stove, the system pulls in smoke, even though filters are in place. This is obviously quite unpleasant.
I got the idea to develop an indoor air quality monitor to solve this problem. Here’s the idea: the monitor contains a particulate matter sensor that constantly measures the concentration of PM2.5 in the air. (PM2.5 is particulate matter with a particle size of less than 2.5 µm.) If I can connect the air quality monitor to a smart home system, I can define a rule that turns off the ventilation system if the PM2.5 concentration exceeds some treshold (e.g. using a smart socket). This should prevent dirty air from being pumped into the home. Great!
A few friends recently introduced me to Home Assistant. Home Assistant is an open-source control system for smart home devices. I was discussing this air quality problem with them and they thought Home Assistant would perfectly fit the task. So, off we went to develop our own indoor air quality monitor that can talk to Home Assistant.
Selecting the electronics
The sensors were selected first. We decided that if we’re going to do this, we’re going to do it well, so we wanted to measure more than just particulate matter concentrations. We ended up selecting the following sensors:
- A Sensirion SPS30 PM2.5 sensor. This little device is a bit more expensive than those sold in the far east, but is widely supported and comes with a lot of detailed documentation, which I consider quite valuable, especially for DIY projects.
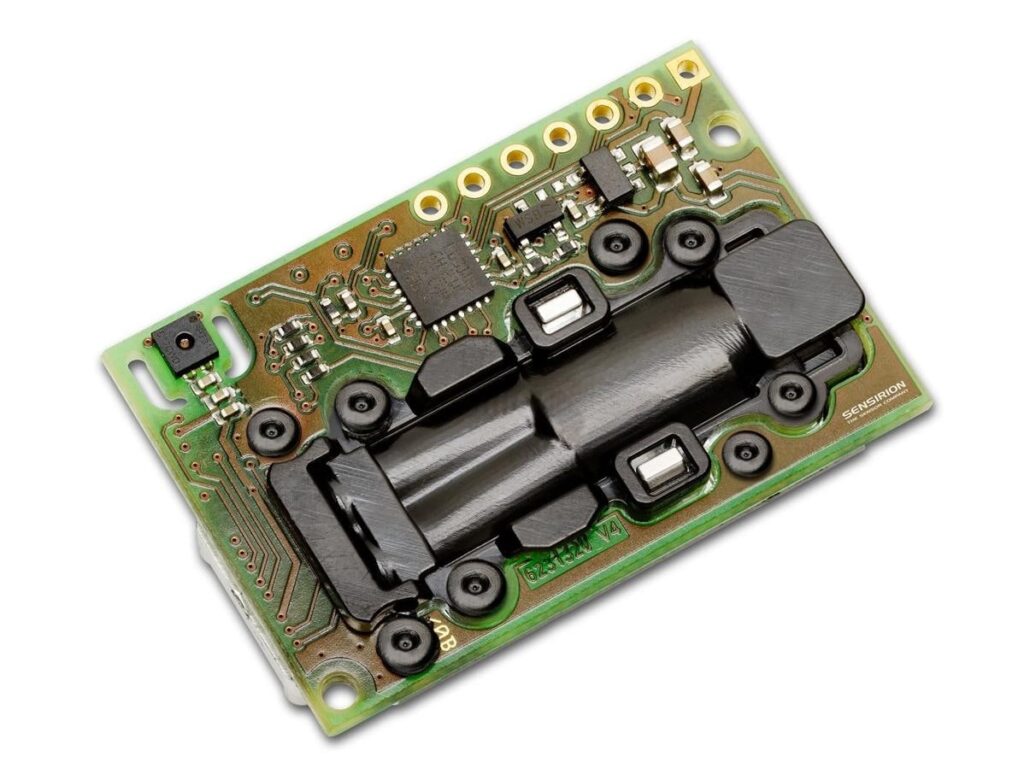
- A Sensirion SCD30 CO2, relative humidity and temperature sensor. This is the most expensive sensor of the bunch at approximately €45. Then again, it is said to deliver reliable measurements and is widely supported.
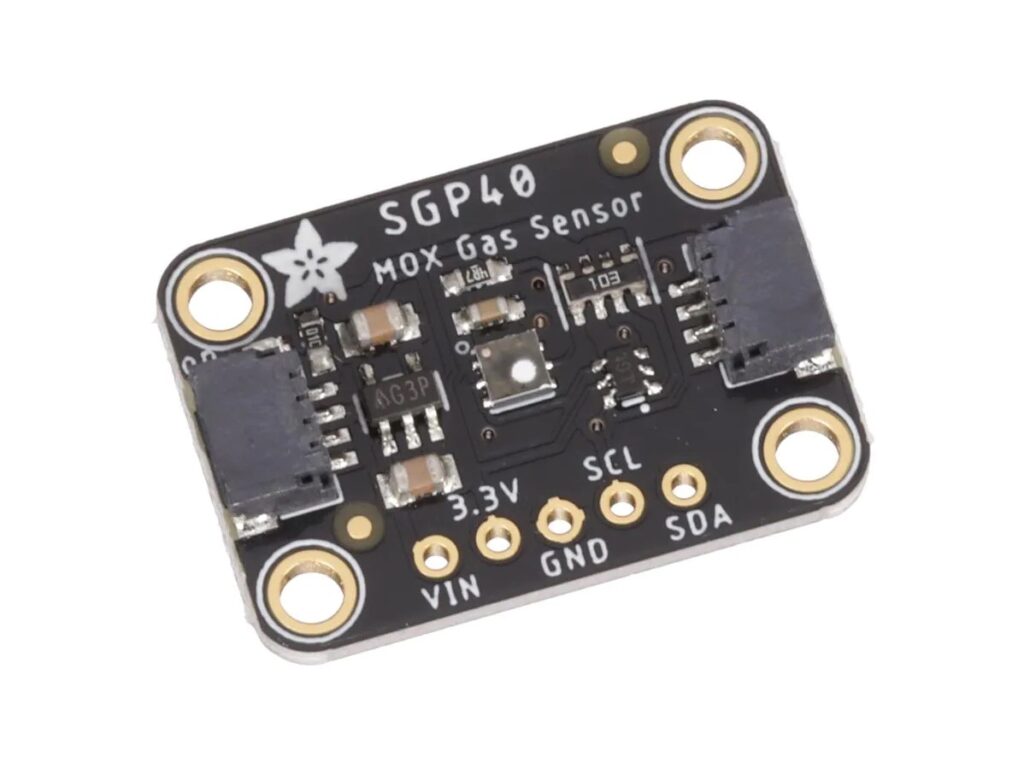
- A Sensirion SGP40 volatile organic compound (VOC) sensor. This sensor picks up volatile chemical substances such as paints and cleaning products. Pretty good stuff.

The sensors can’t do stuff on their own or talk to Home Assistant directly. They need a microcontroller that tells them what to do. Moreover, the microcontroller should read the sensor’s values and send them over to Home Assistant for further processing and interpretation. An ESP32 turns out to be a great microcontroller for this purpose. It has WiFi on board and is relatively inexpensive. Even more important is that an ESP32 can run ESPHome, a system that can control ESP32-based devices using simple configuration files. It integrates seamlessly with Home Assistant. ESPHome supports all of the sensors mentioned above, so it’s quite easy to get everything up and running.
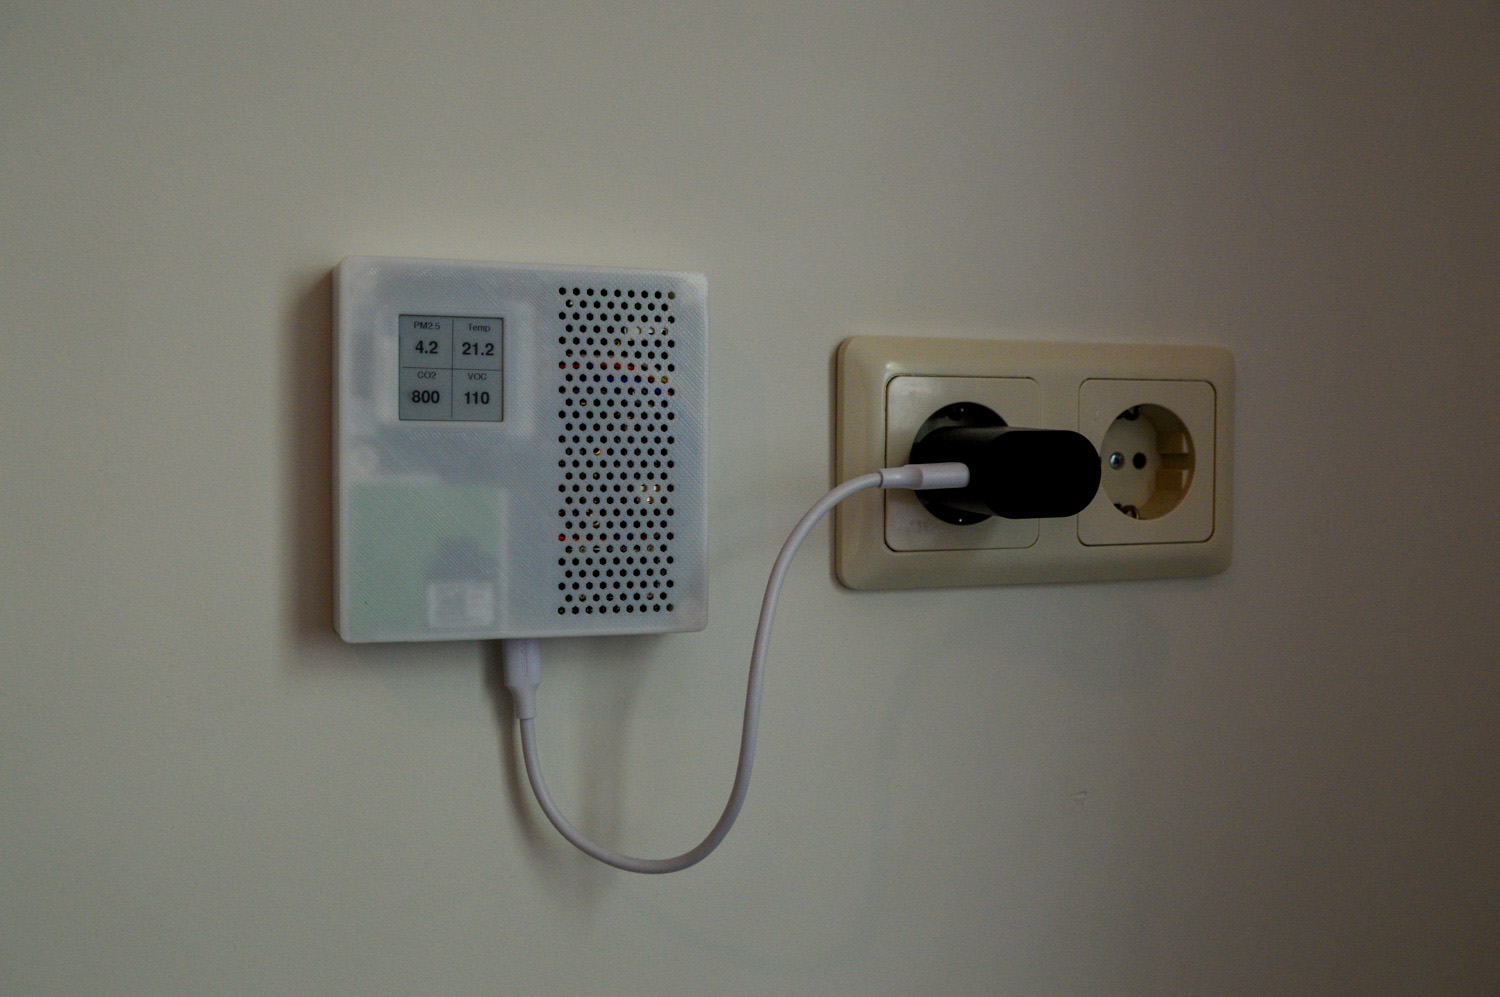
Lastly, we decided it’d be nice if we could read measurements from a display on the air quality monitor itself. We’d therefore need to include some sort of screen. The requirements for the screen are that it must consume little power and not emit a ton of light. After all, we might want to place the monitor in a bedroom. Our solution is found in e-ink screen technology. These screens only use power during screen updates and don’t emit any light. We opted for a square 1.54″ 200×200 screen from the folks at Waveshare. However, after purchasing this part we just couldn’t get it to work with ESPHome for some reason. Though it is included in the build and displays some values on the photo, it is currently not functional.
Designing a printed circuit board
I designed a printed circuit board to take care of all the wiring and also to provide some structural support. The PCB is very straightforward. It contains a few pin headers, a USB-C port and some holes using which the device can be hung on the wall. Below are two pictures of a 3D rendering of the PCB, and an assembled PCB including the electronics that were discussed previously.


Designing an enclosure
The enclosure is pretty straightforward but there were some important requirements to consider. I wanted a slim and modern appearance so chose for a simple geometry that encloses the electronics without much room to spare. Secondly, there is a cutout for the e-ink display. Thirdly, the enclosure features a bunch of ventilation holes such that ambient air can reach the sensors. The holes also serve a cooling purpose. The ESP32 and sensors do generate some heat which influence temperature readings and we want to reduce this offset as much as possible through proper design. We can (and do) compensate this offset in software, though.
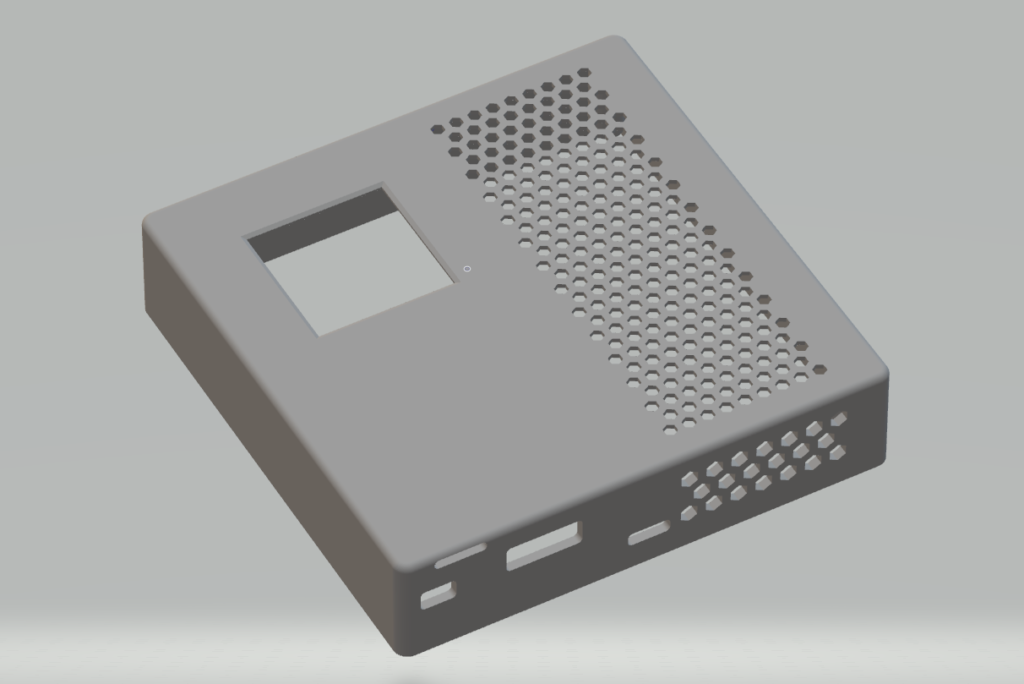
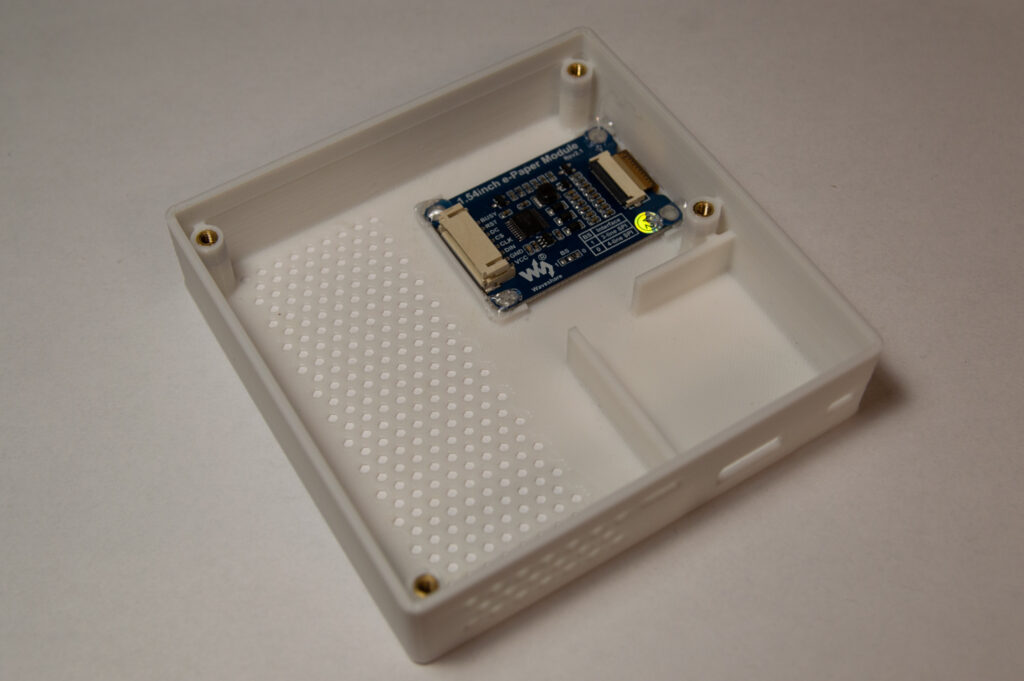
The enclosure also features heat set inserts. Instead of threading bolts directly into the plastic, these brass inserts provide a proper threaded hole to mount the PCB to. They were secured in place using a custom-made tool that can be attached to a soldering iron, just like a soldering tip. The insert is attached to the tip and pressed into the 3D-printed part. The 3D-printed part has a hole with a diameter that is slightly smaller than the diameter of the insert. The plastic melts, and due to the rough surface of the insert, it is firmly secured in place.
Software configuration
I won’t go into the details about setting up Home Assistant and ESPHome because that process is quite complex in itself. After setting this all up, a configuration file for the ESP32 must be written and subsequently flashed to the ESP32 through USB. After the initial USB flashing sequence, the configuration can be updated using the WiFi connection. If all goes well, the sensor unit starts working and sending data over to Home assistant for you to process and visualize! Below is my configuration file.
esphome:
name: airqualitysensor
platform: ESP32
board: esp32dev
wifi:
ssid: "(hidden)"
password: "(hidden)"
# Enable fallback hotspot (captive portal) in case wifi connection fails
ap:
ssid: "Airqualitysensor"
password: "(hidden)"
captive_portal:
# Enable logging
logger:
# Enable Home Assistant API
api:
ota:
# I2C
i2c:
sda: 21
scl: 22
scan: True
# SCD30
sensor:
- platform: scd30
co2:
name: "CO2 concentration"
id: "scd30_co2"
accuracy_decimals: 1
filters:
- filter_out: 0.0
- sliding_window_moving_average:
window_size: 12
send_every: 6
temperature:
name: "Temperature"
id: "scd30_temp"
accuracy_decimals: 2
filters:
# Temperature offset for the onboard temperature sensor
- offset: -2.5
- sliding_window_moving_average:
window_size: 6
send_every: 6
humidity:
name: "Humidity"
id: "scd30_hum"
accuracy_decimals: 2
filters:
- sliding_window_moving_average:
window_size: 6
send_every: 6
automatic_self_calibration: false
address: 0x61
update_interval: 10s
# SPS30
- platform: sps30
pm_2_5:
name: "PM2.5 mass concentration"
id: "pm2p5_m"
filters:
- sliding_window_moving_average:
window_size: 12
send_every: 6
pmc_2_5:
name: "PM2.5 number of particles"
id: "pm2p5_n"
filters:
- sliding_window_moving_average:
window_size: 12
send_every: 6
pm_10_0:
name: "PM10 mass concentration"
id: "pm10_m"
filters:
- sliding_window_moving_average:
window_size: 12
send_every: 6
pmc_10_0:
name: "PM10 number of particles"
id: "pm10_n"
filters:
- sliding_window_moving_average:
window_size: 12
send_every: 6
address: 0x69
update_interval: 10s
# SGP40
- platform: sgp40
name: "Volatile organic compounds"
compensation:
temperature_source: scd30_temp
humidity_source: scd30_hum
unit_of_measurement: "pts"
filters:
- sliding_window_moving_average:
window_size: 6
send_every: 6
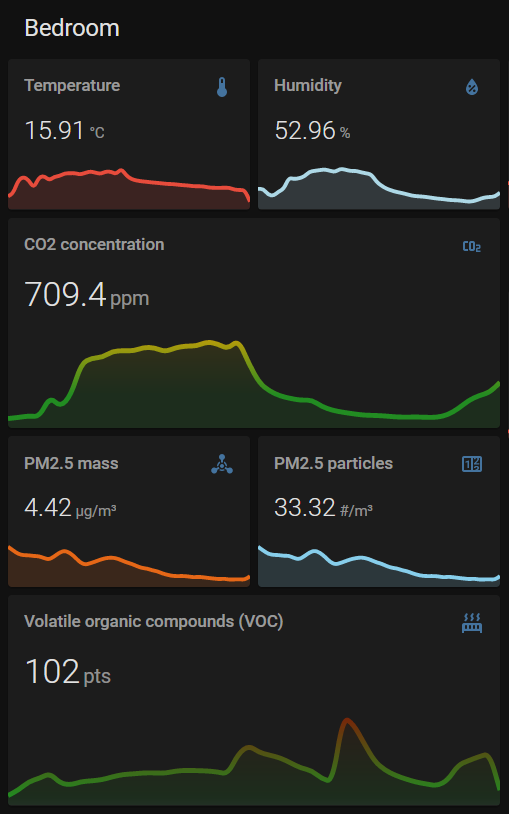
update_interval: 10sI’ve configured the data to be visualized like this using mini-graph-card:
I hope you liked this post! Feel free to post any questions in the comments below. Source files for this project are available on my Github, (here).
Dag Willem,
Wat een leuk project! Ik ga hem zeker nabouwen.
Ben je nog van plan om het display werkend te krijgen?
Met vriendelijke groet,
René
Hoi René, bedankt! Ik heb dit een aantal keer geprobeerd maar het is me niet gelukt. Geen idee wat het probleem is. Als er een “v2” komt haal ik het scherm er in z’n geheel uit, want ik lees de data toch altijd uit de app af.
Hi,
No sensors for PM1 or 4.5 inbetween? What esp device are you using ?
Hi, the Sensirion SPS30 measures particulate matter in various ranges. I think the supported levels are PM0.3, PM1.0, PM2.5, PM4.0 and PM10. You’ll have to check the datasheet and ESPhome documentation for this. I am using an ESP32 devkit D.
Yeah, was just wondering why you didn’t setup those in your config. Also, doesn’t the SPS30 support VOC ?
I didn’t set them up because these other ranges appear to be quite unreliable. I think the sensor unit only really measures PM2.5 and derives the rest from that through some ‘magic calculation’. Therefore I find the other ranges pretty useless…
No, the SPS30 does not include VOC measurements. Have a look at SEN54. It does.
Ever thought of building and selling this for people who are not tech savy builders (like myself)?
Not really. I think it would become pretty expensive. The BOM already is well above €100 and I doubt many people would pay multiples of that (which is typical for many products).
Hoi Willem, gaaf. Ik had toevallig exact dezelfde sensoren in mijn winkelmandje gezet. Toen ik zocht op behuizingen kwam ik jouw project tegen.
Heb je toevallig nog een pcb liggen die je wilt verkopen, en eventueel een behuizing? Hoor graag want ziet er direct goed uit.
Hoi Richard, ik heb niets meer liggen helaas, maar je kunt eventueel wel zelf aan de slag omdat ik alle bronbestanden beschikbaar heb gemaakt. Wat betreft de behuizing moet je dan wel aan de slag met gereedschappen om de draadinzetstukken in het plastic te zetten, en wat betreft de printplaat moet je het een en ander solderen. De USB-C-aansluiting en de bijbehorende pull-upweerstanden (5.1k) laat ik er al op solderen door de leverancier van de printplaat.
Dear Willem,
What a neat design!! It looks so cool and useful with its own screen!
BTW, I would like to ask you about the connection between the SPS30 and the ESP32. I guess that you have connected SDA and SCL to GPIO21 and GPIO22 ports on ESP32, right?
Thanks for share your project!
Jordi
Hi Jordi,
Thanks! You’re right about the i2c connections. However, you can use any (suitable) pin on the ESP as far as I know.
Willem
Can you also share your mini-graph-card configuration? I really like it!